dev log #12 - custom modifiers

Hello again! As we start to wrap up for wider release we've got plenty to talk about - this is part 2 exploring what it feels like and looks like to use luxe to make games, in concrete detail, so get a cozy seat and we'll talk even more about it. See part 1 below.
https://luxeengine.com/dev-log-11/
Please keep in mind all images and details are work in progress/not final ✨
Make your own modifier
The luxe 101 section (from dev log #11) mentions how we can never provide every possible system without getting too unfocused. This is by design, so you often want to create your own to make the game part. Also modules would exist with their own provided modifiers of course.
The 'custom' wording isn't quite exact, because the provided modifiers are implemented in the same way yours would be, including the luxe ones. As is typical in luxe design philosophy, we try not to special case the engine module, and implement things as if we were making game specific stuff in the first place.
That includes things like custom editor integrations, the definition of modifiers and more. The big difference is just that the API and internals live inside the core runtime, rather than not.
What does a modifier do?
We've mentioned a modifier gives an entity meaning through the system that implements it, but what does that mean exactly?
We can think of a modifier as 3 main parts:
- The data it stores for each entity
- e.g Sprite
color
- e.g Sprite
- The API the user speaks to, to interact with the system
- e.g
Sprite.set_color(entity, color)
- e.g
- The implementation of the system
- applying
colorto that entity via a geometry that it owns
- applying
So the answer is "a few things".
This is guiding principle/convention, but games can still get pretty granular with their systems.
How to define a modifier?
In luxe, a modifier is defined in code.
Let's look at each piece before we see the full example.
To start, we'll make a simpler modifier that acts as a clock that adds up time. When you attach this to an entity, the entity will know how long it has been alive.
We'll make a file called system/clock.modifier.wren. A convention is to put systems in system folder as we saw before with luxe: system/transform.modifier. The .modifier.wren part isn't optional, this is the how the luxe asset pipeline knows that we want to treat this particular script as a modifier. This handles everything from there.
1 - Defining per entity modifier data
Inside the file, we'll start by defining our data. There's a concept in luxe called blocks that we'll cover in detail in a near future tech post, but in short, it's a schema based data definition.
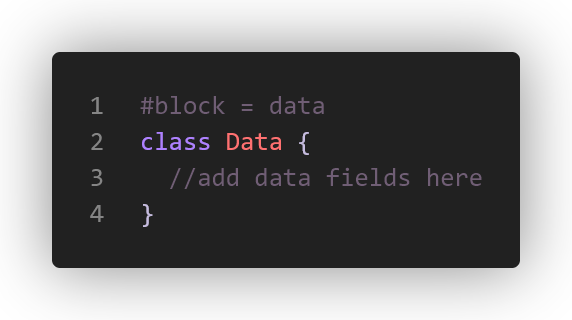
It uses a Wren class to define the fields of the data block, and has concrete types and rules that are a little special but power a ton of things. In this example we just need a single variable for time, so at the top of our modifier we have this simple definition:
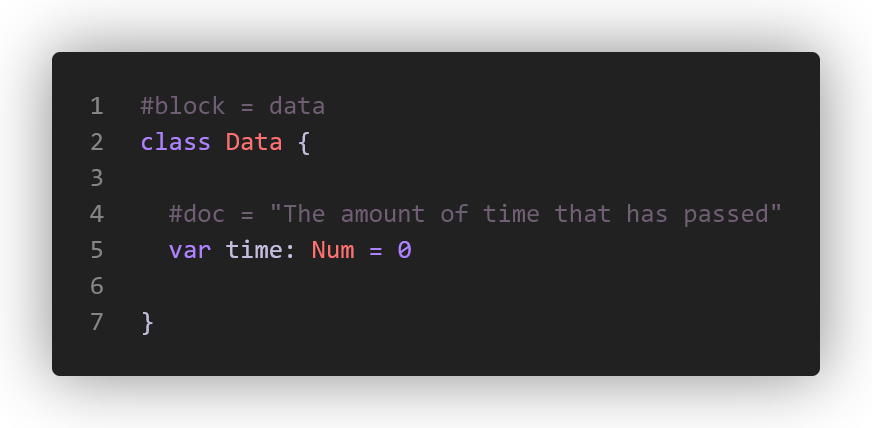
There we go! Piece one is out of the way.
2 - The user facing API
Now let's say we want to make it possible to reset the clock from the game code elsewhere - if you've followed along, you'll notice the convention is a static API, which will be Clock.reset(entity: Entity). Inside our game.wren we can do Clock.reset(player) for example.
This is what the emptiest version looks like:
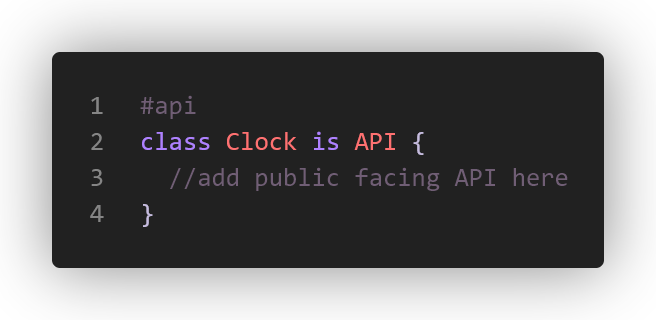
Here's a more typical example. There's various ways to customize how the modifier is displayed, and user facing info we can show.
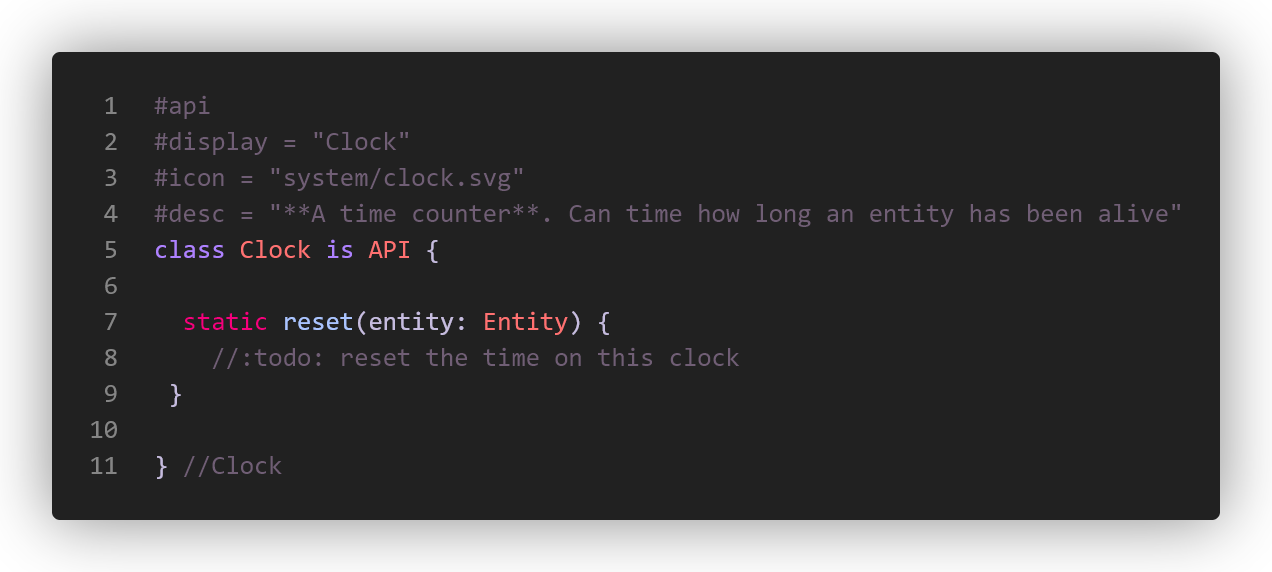
Now that we've defined a modifier, it already would be visible in the editor/project, and uses the meta data we gave it to display. Since we don't have that icon in place yet, it displays a default one.

Once attached, we also get full support of our fields in the editor with no effort:

The API class that ours inherits from (Clock is API) does a lot of work for us to make our day easier. Let's reset the time value inside our API function. To do that we use the get(entity: Entity) : Data method. This returns the per entity data block for us to use!
There's also system(entity) which returns our implementation, and other helpers too. You'll often also find functions like set_gravity(world: World, ...) where instead of speaking about the individual entity you're speaking to the system itself.
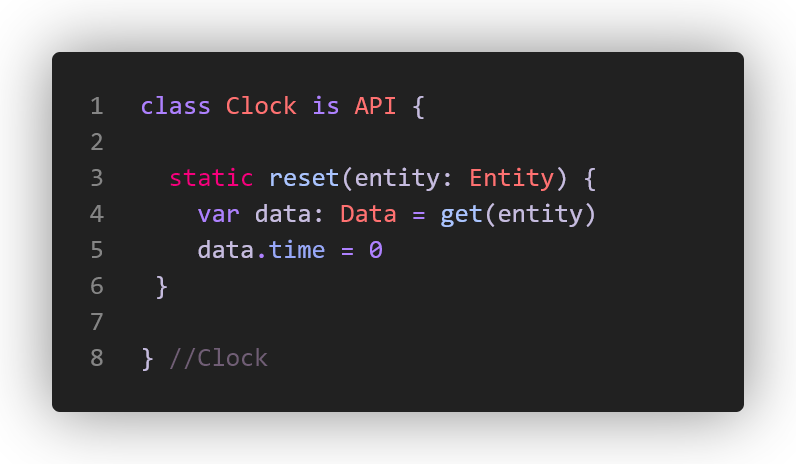
Either way, since our data type is actually well known, we get full completion:

Also the type is often inferred and shown as an inlay hint, you don't have to explicitly type everything, I am doing it to make things (hopefully) clearer ✨

We also technically didn't need to create the reset function, because the API also has accessors for us that the user can use without us having to expose everything manually. Like Clock.get.| and Clock.set.|. But of course, many times you want to validate inputs, and do more than just update a value.

There's way too much to cover here (this isn't the user manual, just an introduction!) but that's how we give the user a nice to use experience that is consistent across modifiers by convention, and makes it easy to understand what happens where - you know where to look.
3 - The system implementation
And finally, our clock needs to actually update the per entity data. We do that in our system implementation. Again let's look at the very minimal one:
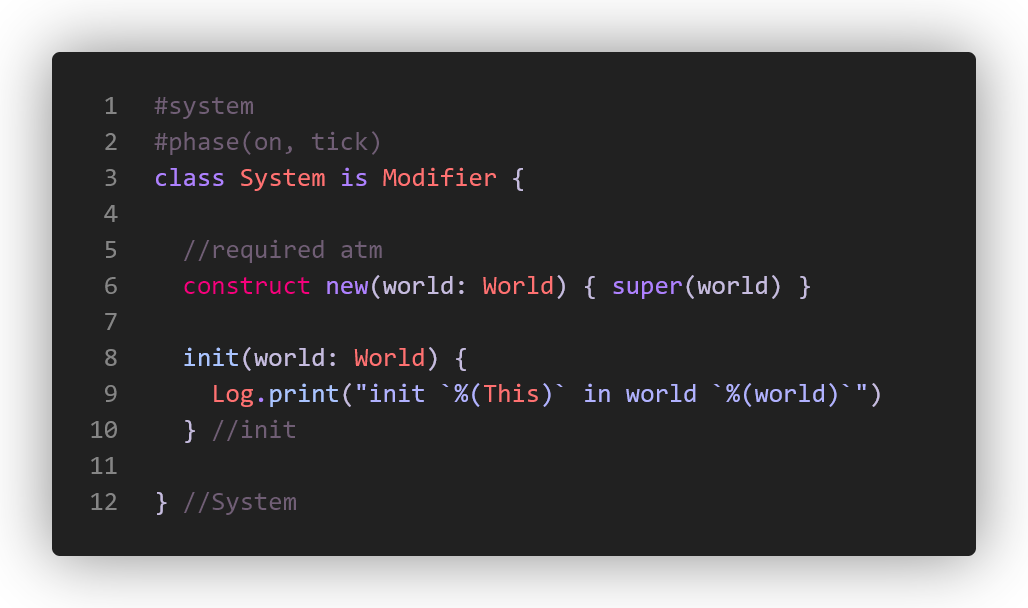
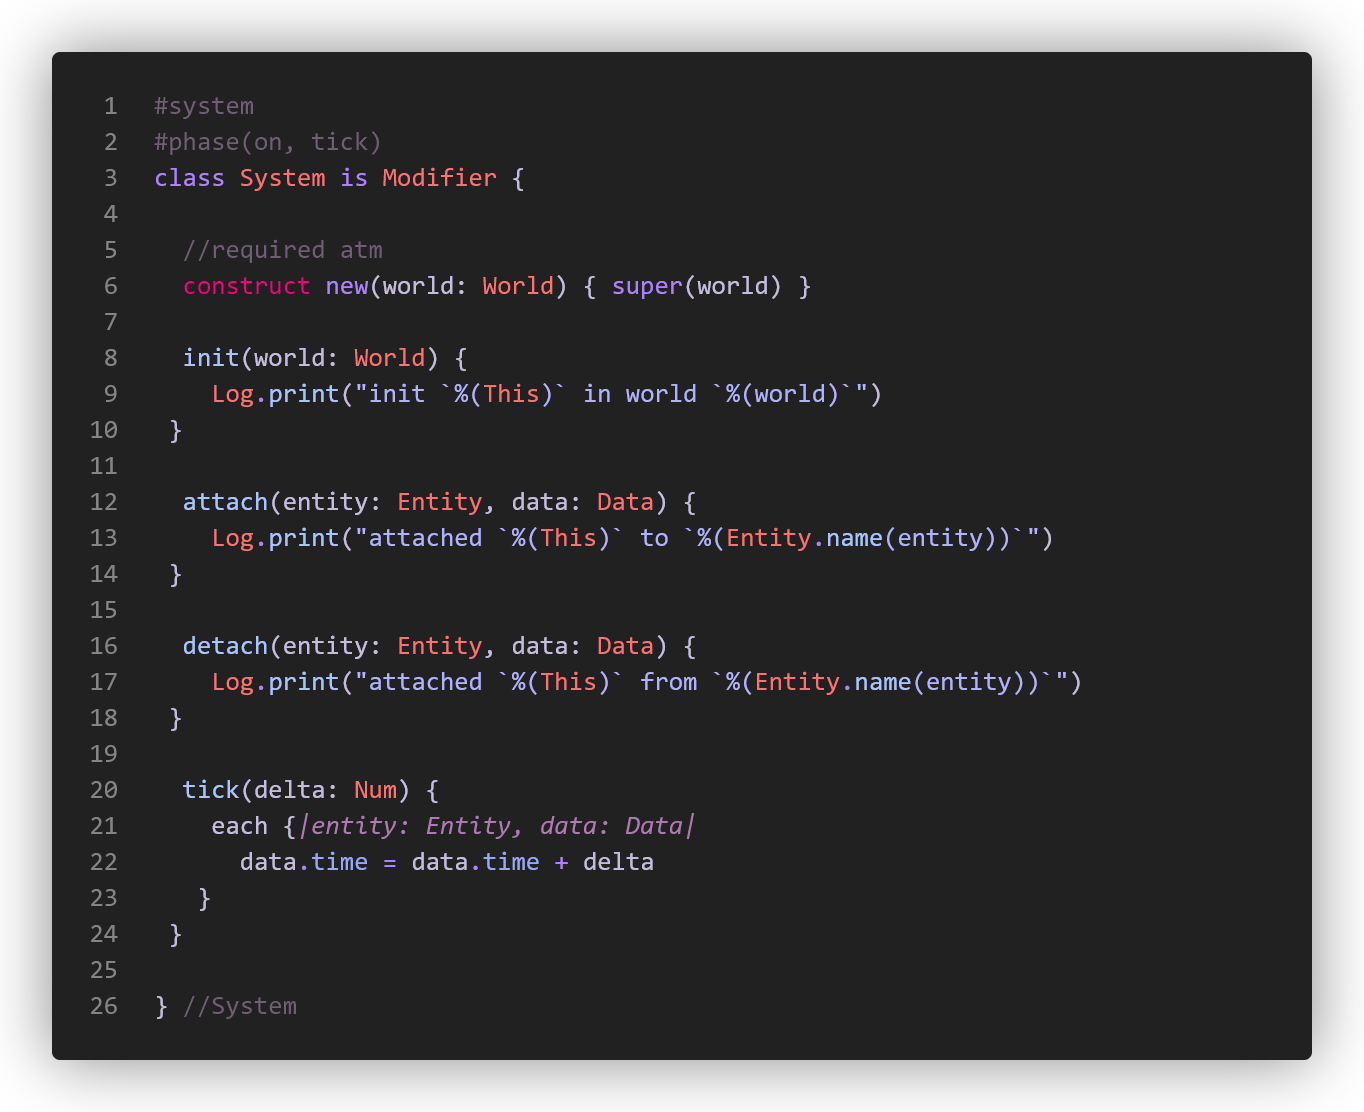
And this is a more typical look, with the implementation of our actual system where we increase the value of time.
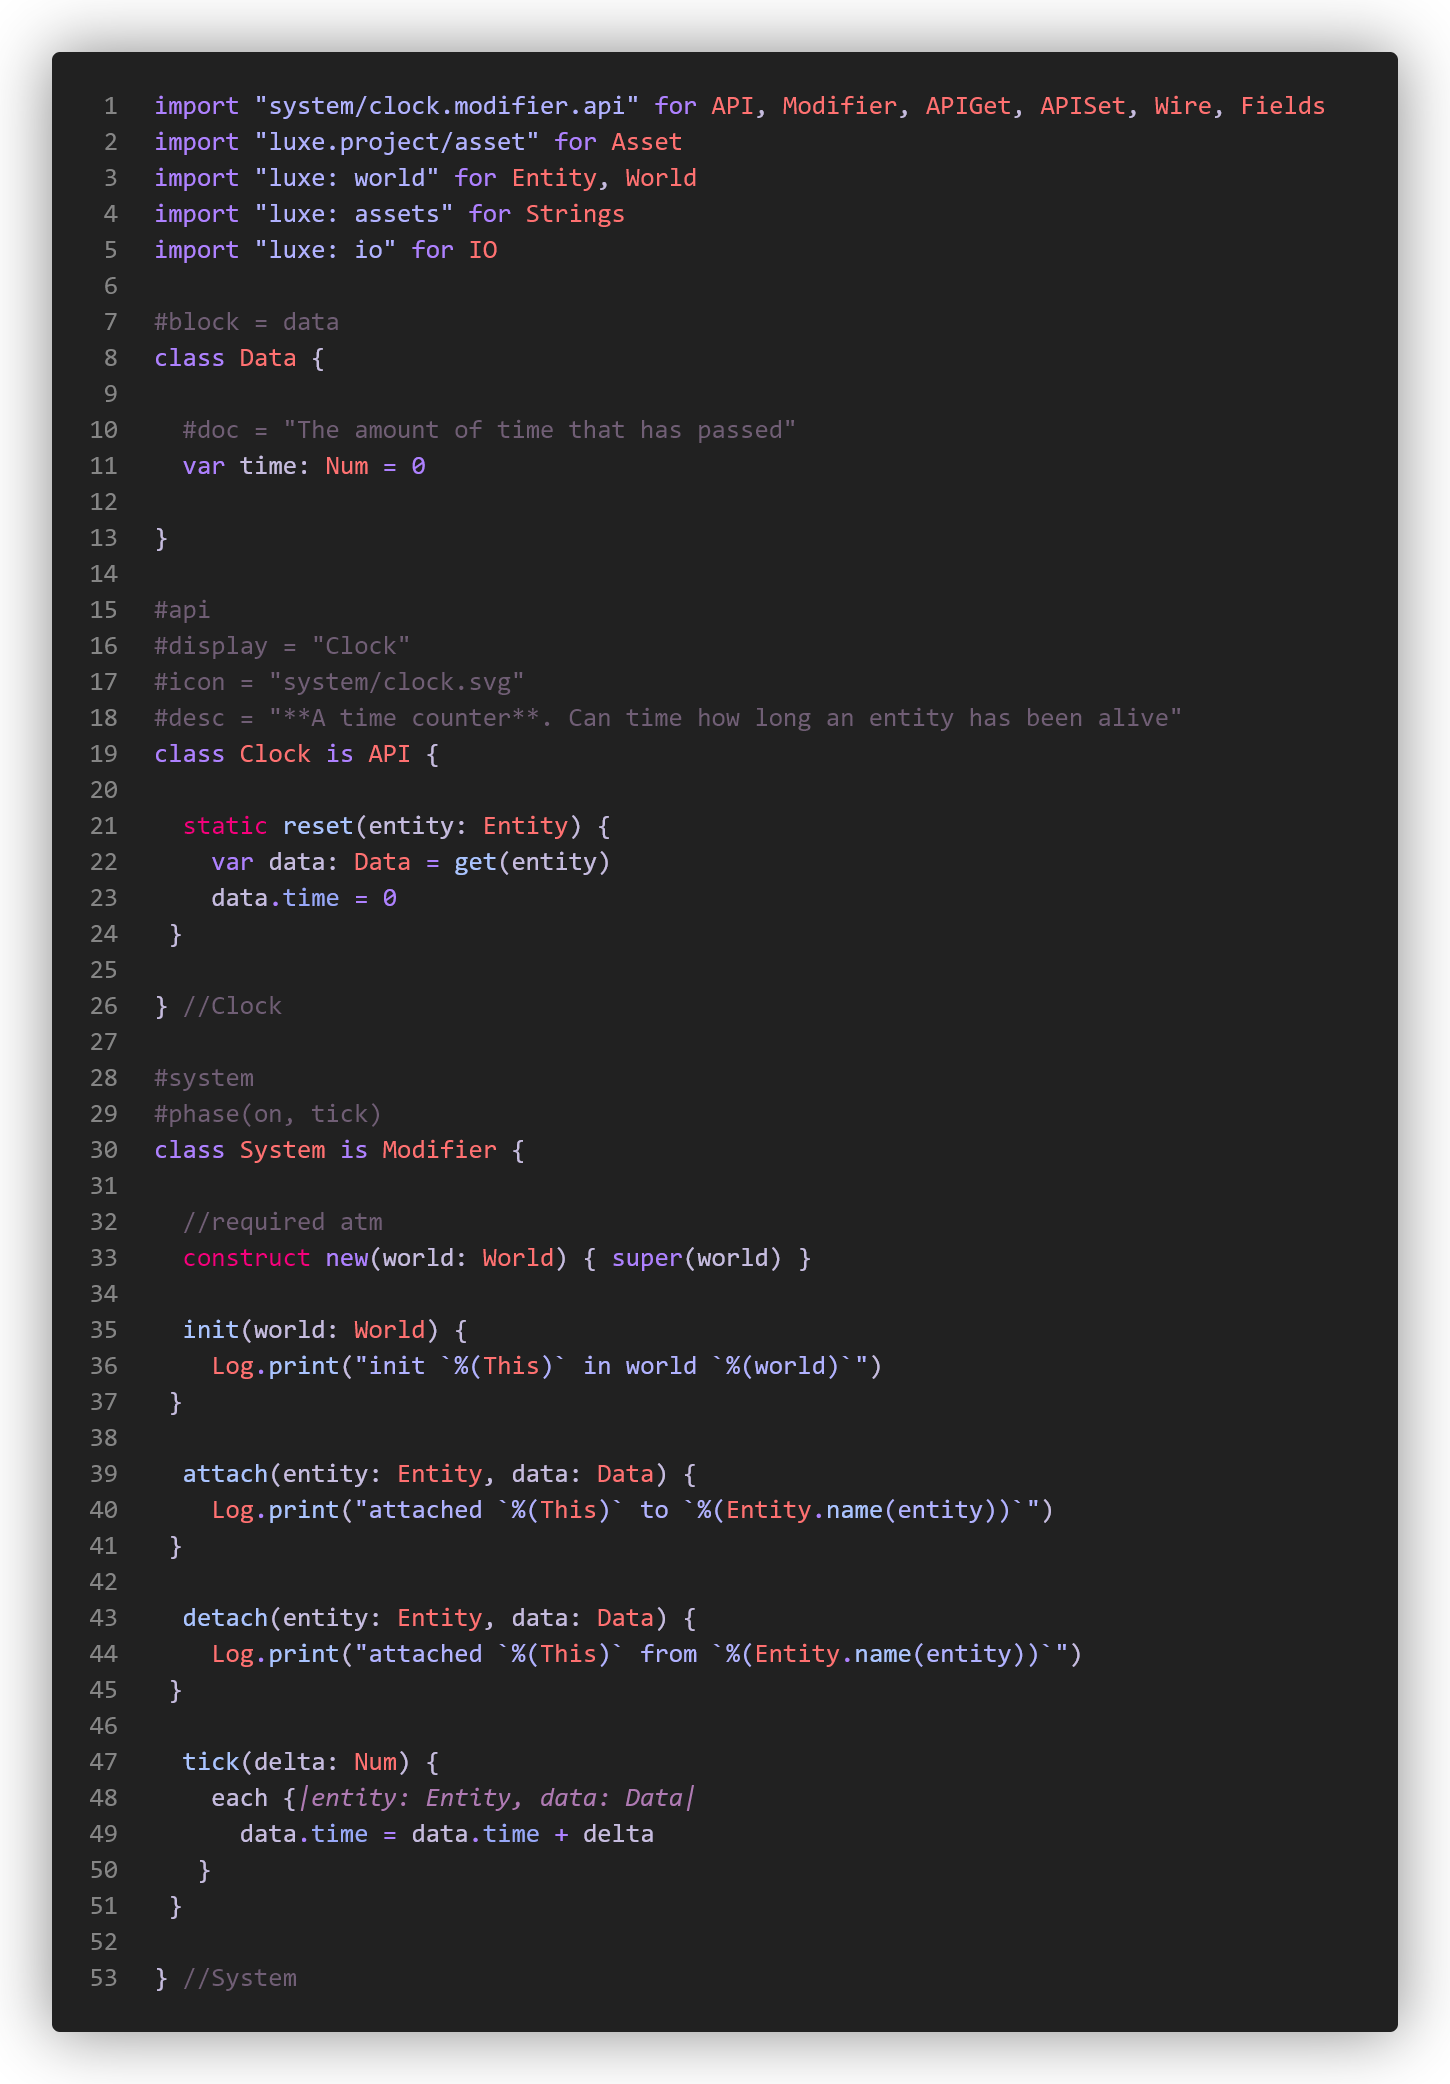
And here's the full listing of system/clock.modifier.wren for clarity.
Things you'll learn more about in the docs
- How to respond to changes in the data
- How systems are per world, and operate in plural instead of singular.
- e.g a Door system knows about all doors, no searching or finding or anything. There's a lot of reasons for this and is too in depth for an intro!
- How modular systems like
Interactableallow you to snap a modifier onto any object and it becomes something the player can interact with, and so much more - All the helpers and conveniences, the data types that are available, nested objects, arrays, the groupings, the
#show_iffiltering, the world and runtime data blocks, the editor integrations, the ways in which this design enables serialization, parallelization, replication and so on in future.
Practical examples
So this is a single field, but all the modifiers you've seen in the last post like Sprite and Text are defined in the exact same way, and use the same data blocks.
Let's look at a few examples of modifiers from our games that also include stuff like editor side customization and debug drawing. For us, luxe is all about the game specifics and the ability to do expressive things, and will always continue to be easy to do that.
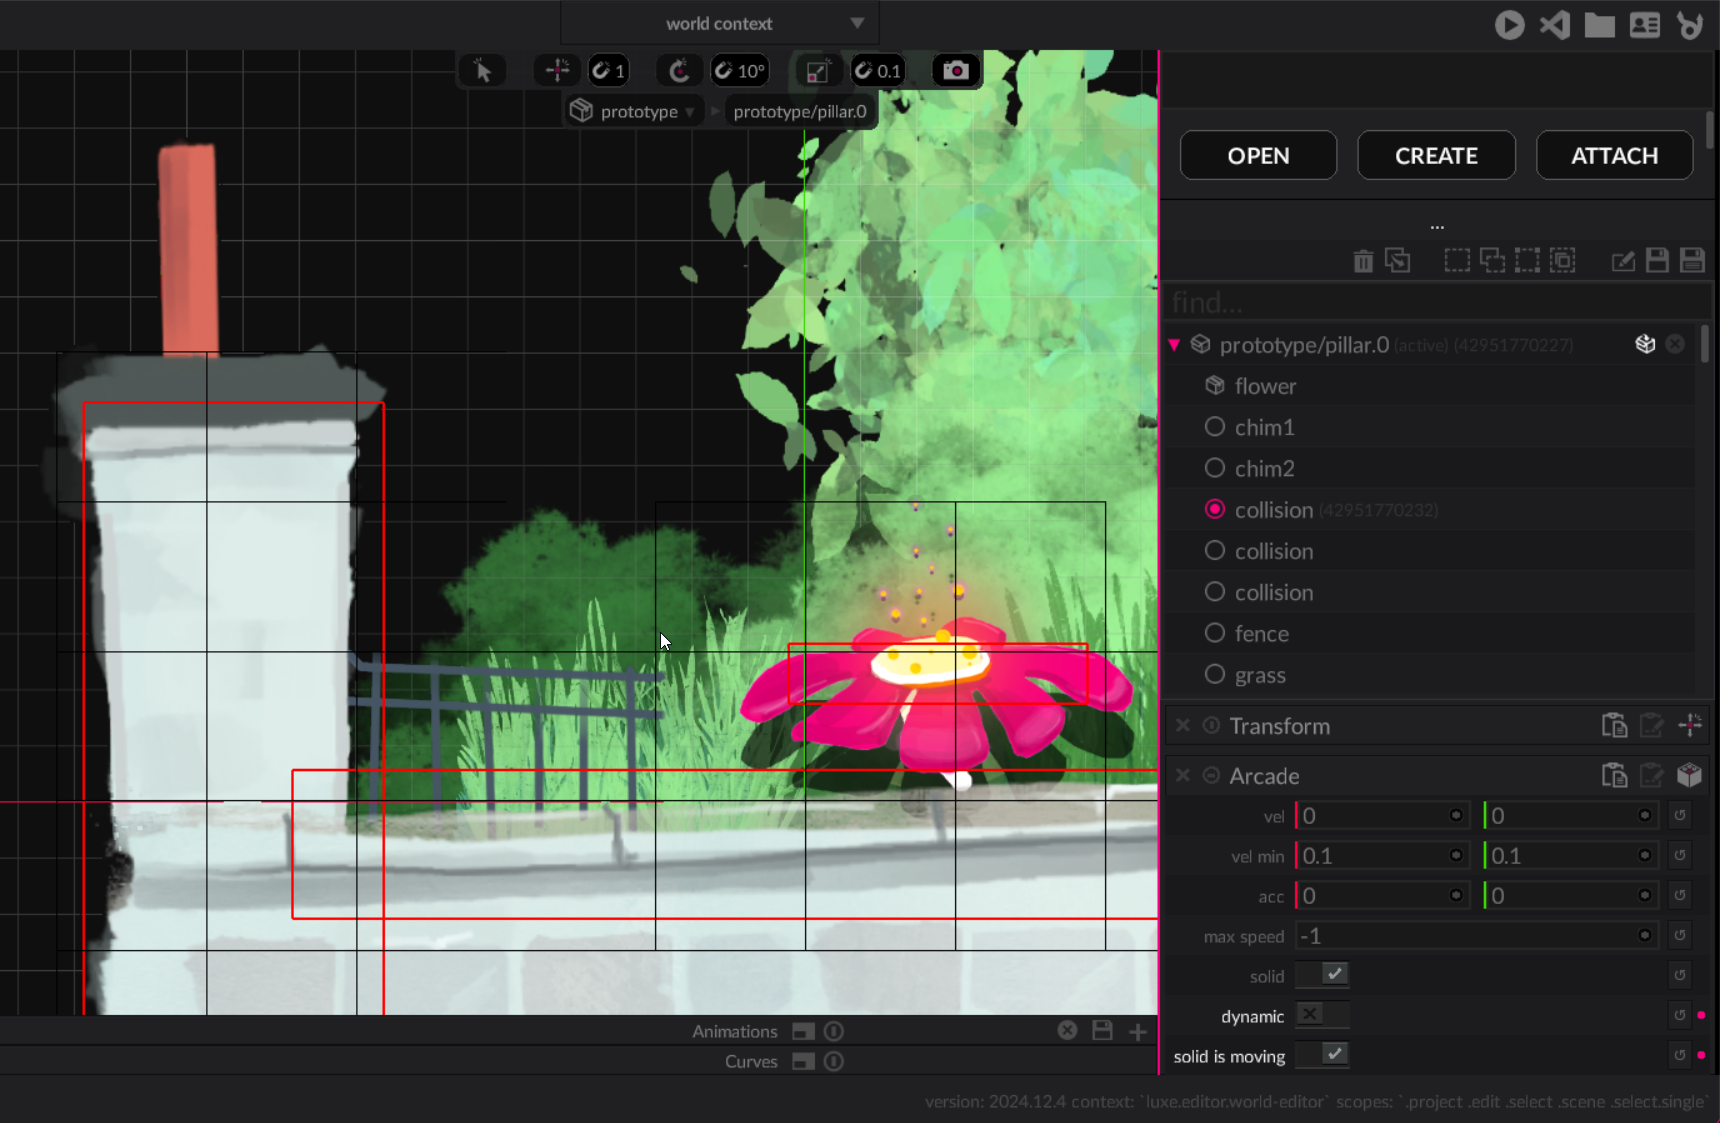
Arcade
A simpler example to start, we've spoken about arcade a lot, it's a simpler physics system for games that uses the editor integration to display debug visualization in the editor. The red (collision shapes) and black outlines (spatial hash) show up in editor so you can see them.
Camera
The camera modifier implements custom editor debug vis as well, by displaying the frustum with per camera settings, and also when selected will show a preview of what the camera is seeing. The editor knows nothing about this, it's the modifier doing it using the editor tools.
Director
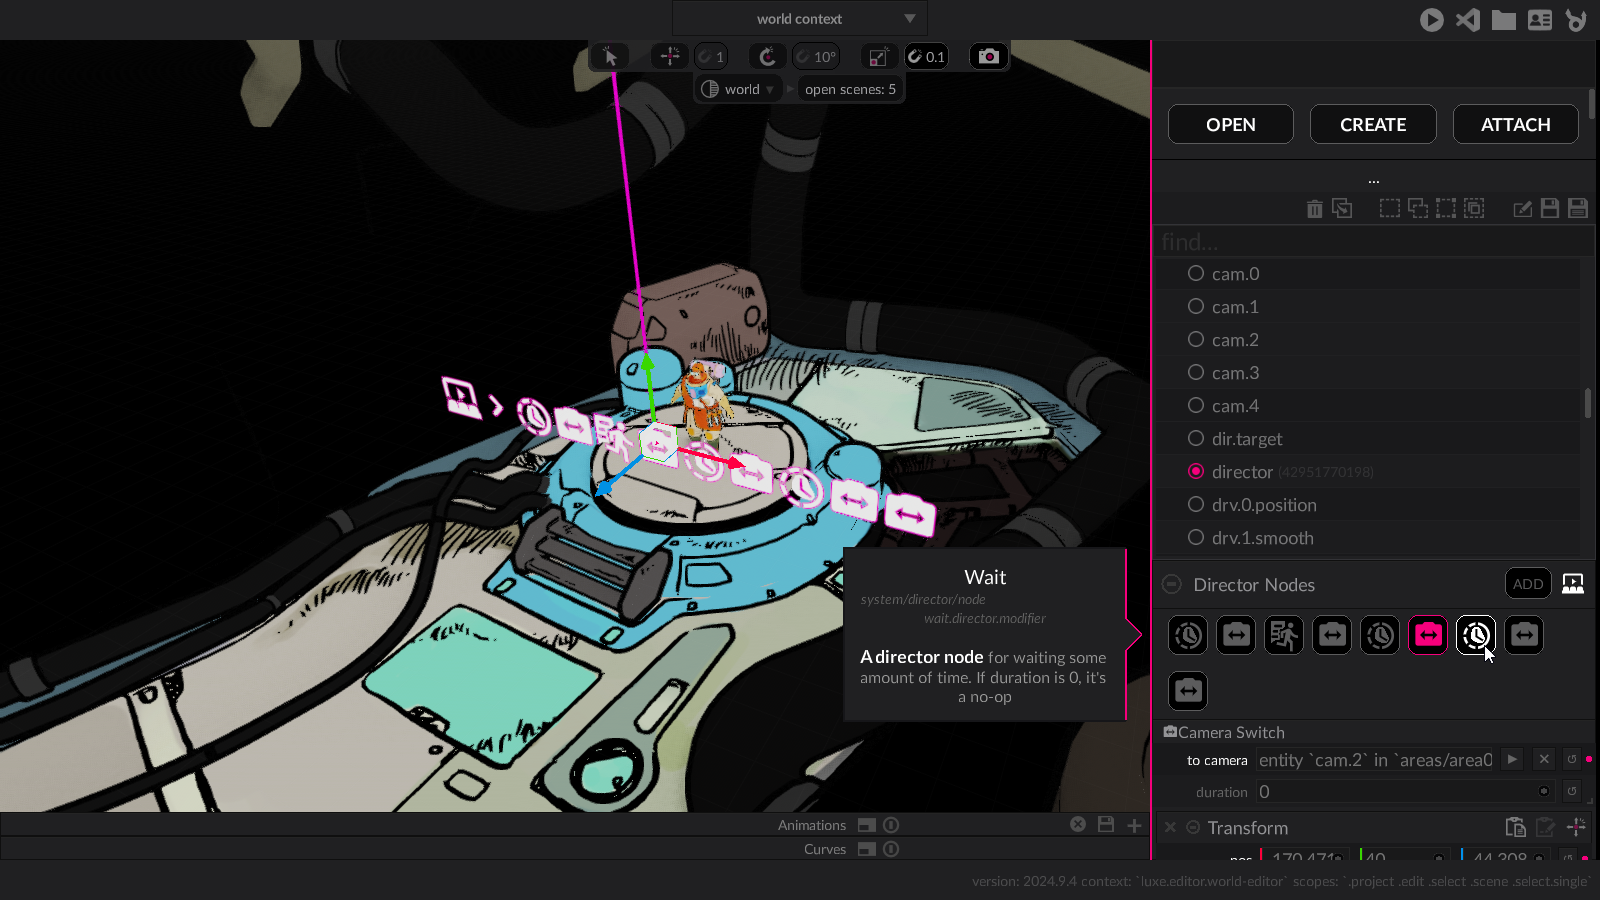
I spent a few hours writing a small game side tool to make simple sequences easier to create. The workflow goal here with a few clicks I can make a sequence of actions like "walk here", "interact with thing", "switch camera" easily.
It runs nodes in order and has custom UI panels to allow a smoother editing experience - notice the "Camera Switch" panel under the "Director Nodes" panel, this is custom UI added by the Director modifier.
You can also see the in world icons and vertical locator beam, all easily customized for spotting cutscenes in the world. None of those show in game unless asked (ignore the messy bits).
Wires
There's one more extra part to mention around modifiers (and scenes). Not every user is going to be writing system code, that's why modules exist, to share systems like Arcade so that more people have the option to make a game with less experience.
A big goal of luxe is to be approachable and accessible to a wider range of users, and one of the tools to do that comes in the form of what we call Wires.
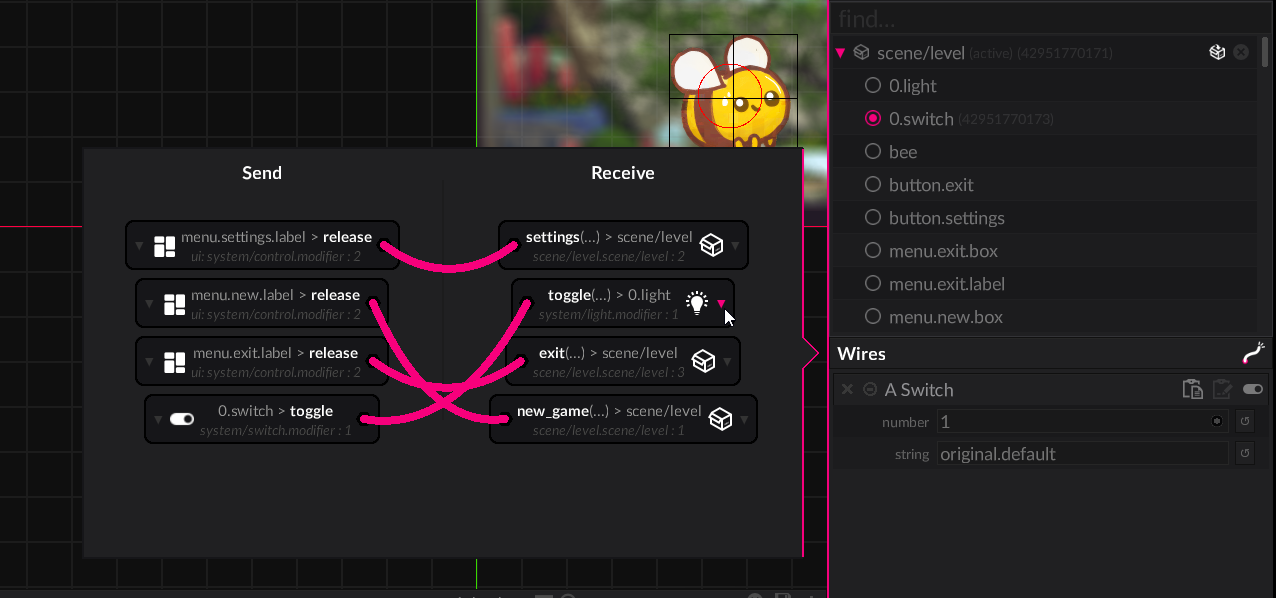
Here we can see how they look in motion (wip, as mentioned).
There are many ways to use this tool and discuss it - it's a very common paradigm and has been for decades - but let's take a look at two obvious examples of things you can do without using code:
- Switch -> Light: Connect a switch to the lights that it will control
- Trigger -> Door: Connect a trigger near to a door, it will open on enter
Outgoing wires
Any modifier (or scene script) can expose a wire to send from (left hand side) or connect to (right hand side). We'll take a look at a Trigger example. How do we define a wire to send across? We define a variable and tag it with #wire and give it an id.
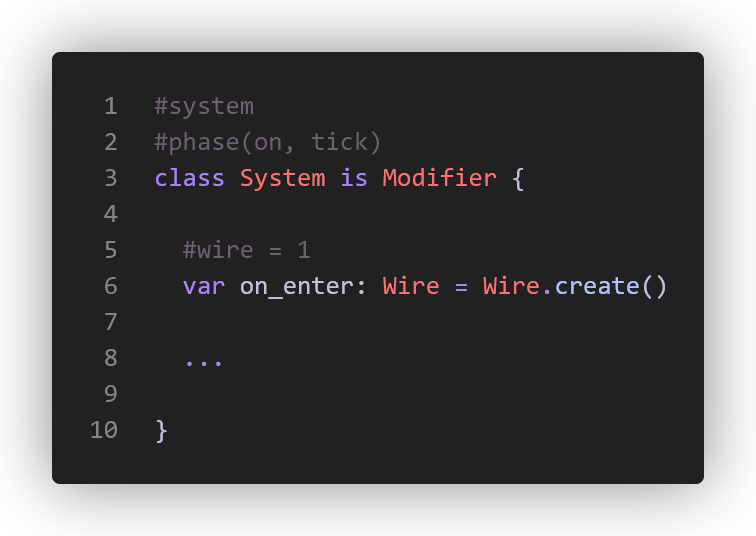
With that, we now have an outgoing wire. How do we send a message on the wire? Imagine we've connected to physics, here is how we trigger it:
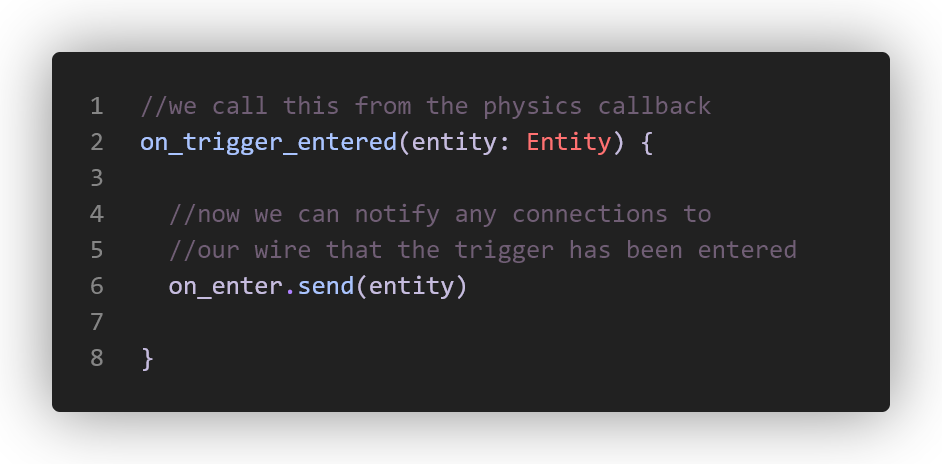
incoming connection
How do we make a function visible to send a message to, so it can show up on the right hand side for us to connect to?
We tag a function with #wire and an ID. That's it!

There's more to the system, like connecting via code. These show up in code completion and such. Here's a real code example below, and you'll notice we can also send full typed blocks across the wires - the contact argument shown.

Wires are one of my favorite things to land as it makes it's possible to use luxe for a wider range of users, and we have a lot of plans to show soon.
Bonus points
#button
In the camera video above, you'll spot a button in the modifier panel that says align to view... There's a lot of times we want a button for the user like this. In a modifier, if you tag a number field with #button you'll get one. You then respond to it changing (a click is += 1) and there ya go.
in game inspection
Because of how this system works, we can also display an inspector directly in game, allowing inspecting/editing of things directly for debugging purposes. This is always going to be evolving but is already plenty useful! This is currently in a debug module that you can opt into.

Next time .... scenes, prototypes, templates
Now that we have modifiers, can use them through code and see them in the editor, how are they actually stored on disk, how do we load them, and what tools are available for prefab-like things? That's the next post.
Part 2: fin
Our journey in seeing what it looks like to use luxe continues! Below are links to the previous and next post in this series:
Get the latest news
All posts in this series:
